Run tasks with AWS Fargate and Lambda
As with any other financial company, at Marqeta, we have a good number of batch jobs, which we are migrating over to AWS Batch. However, even in managed mode, AWS Batch needs us to define Compute Environments, which are clusters of EC2 instances running ECS (and Docker) agents.
AWS Fargate was announced very recently at re:Invent 2017. Fargate adds a layer of abstraction on top of the Compute Environment, or the ECS Cluster. We no longer have to worry about the AMI, EC2 types, task placement, etc. In this post I cover the POC done to use Fargate over AWS Batch for batch processing, but this can also be used as a tutorial for running any type of tasks using Fargate. We create an ECS Task definition, a Fargate Cluster, and a Lambda to run the task using CloudWatch Event trigger.

Setup
-
We will use the AWS Console, but everything in the console can also be done via CLI. I prefer console, as this is a very new service, so we can see all the options etc. without digging in the documentation.
-
A docker image to act as a task. I am using a simple task that sleeps for 5 seconds and exits.
-
A Lambda Function to run the task.
The Lambda cannot use the current Python Lambda Execution Environment, as at the time of writing, it is pre-installed with Boto3 1.4.7, which lacks support for Fargate tasks. So we bundle Boto3 1.4.8 in the Deployment Package. Sorry, no Cloud9 IDE here.
-
A VPC to tie down the task to. I use my Terraform-based repo to bring up a VPC, and tear it down when done. If not, then make sure you have a public subnet, or a private subnet with NAT gateway tied to it. ECS will need to pull the container image over the internet, and will need outbound internet access to do so.
-
Since I am not diving deep into Task Definition, familiarity with creating one will be helpful. Refer to my earlier post on ECS for terminology and details.
Creating the Docker image
This is the task that will simulate the batch job, task.py -
import time
print('Task starting..')
time.sleep(5)
print('Task ended, took 5 seconds')
And this is the Dockerfile -
FROM python:3.7.0a2-alpine3.6
COPY task.py /tmp
CMD python /tmp/task.py
Next, we go ahead and build, and test the image.
$ docker build .
Sending build context to Docker daemon  4.096kB
Step 1/3 : FROM python:3.7.0a2-alpine3.6
 ---> e0e4e8202722
Step 2/3 : COPY task.py /tmp
 ---> 1a8de050909f
Step 3/3 : CMD python /tmp/task.py
 ---> Running in aad2bec4df49
 ---> 65852146fb13
Removing intermediate container aad2bec4df49
Successfully built 65852146fb13

$ docker run 65852146fb13
Task starting..
Task ended, took 5 seconds
Now we can tag and push this image to ECR repo. Create a repo called python-batch-job in ECR.
$ docker tag 65852146fb13 python-batch-job:latest
$ aws ecr get-login --no-include-email --region us-east-1
$ docker login -u AWS -p **** https://************.dkr.ecr.us-east-1.amazonaws.com
$ docker tag python-batch-job:latest ************.dkr.ecr.us-east-1.amazonaws.com/python-batch-job:latest
$ docker push ************.dkr.ecr.us-east-1.amazonaws.com/python-batch-job:latest
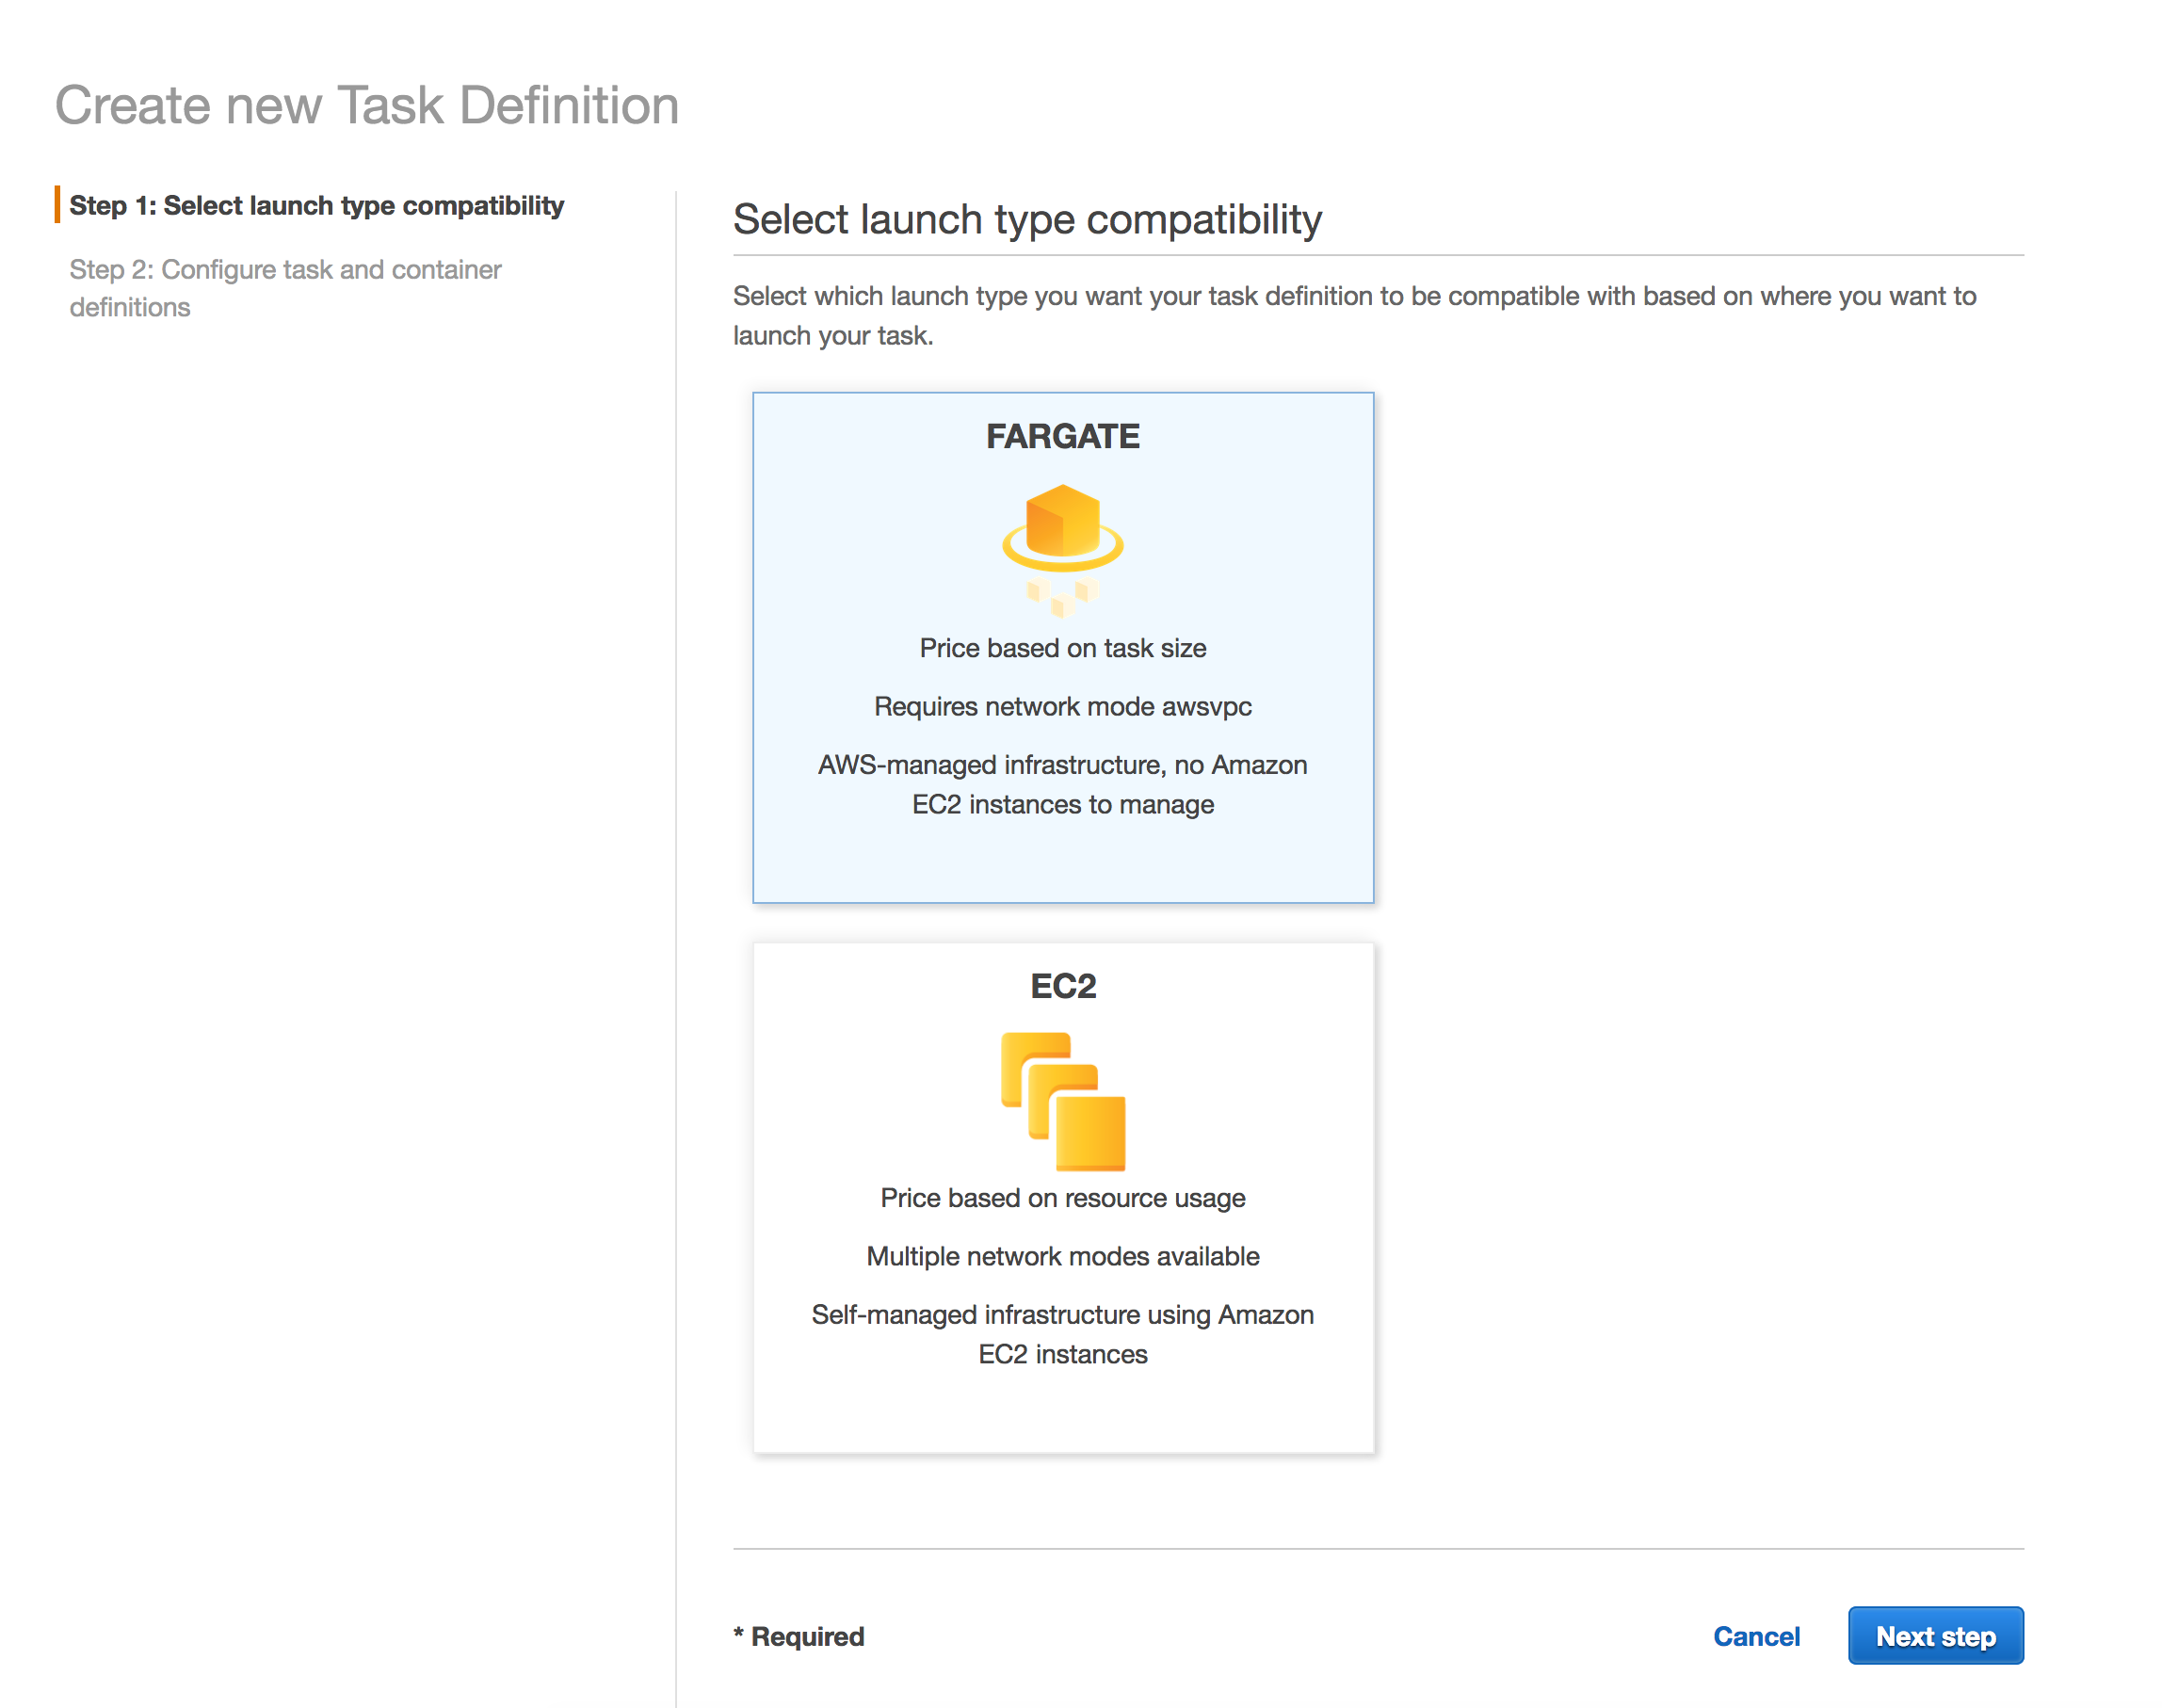
Task Definition
We will need to create an ECR Task Definition. To do so, we head over to the ECR Console, and pick Fargate.
Regarding the next steps, assuming you’re familiar with ECS Task Definitions, create a Task Definition using the container image from ECR. You can leave everything as default, and pick Task Memory as 0.5 GB, and Task CPU as 0.25 vCPU. When adding the container, you can specify the Hard Limit to 128 MB, and 1 CPU Unit (under Environment).
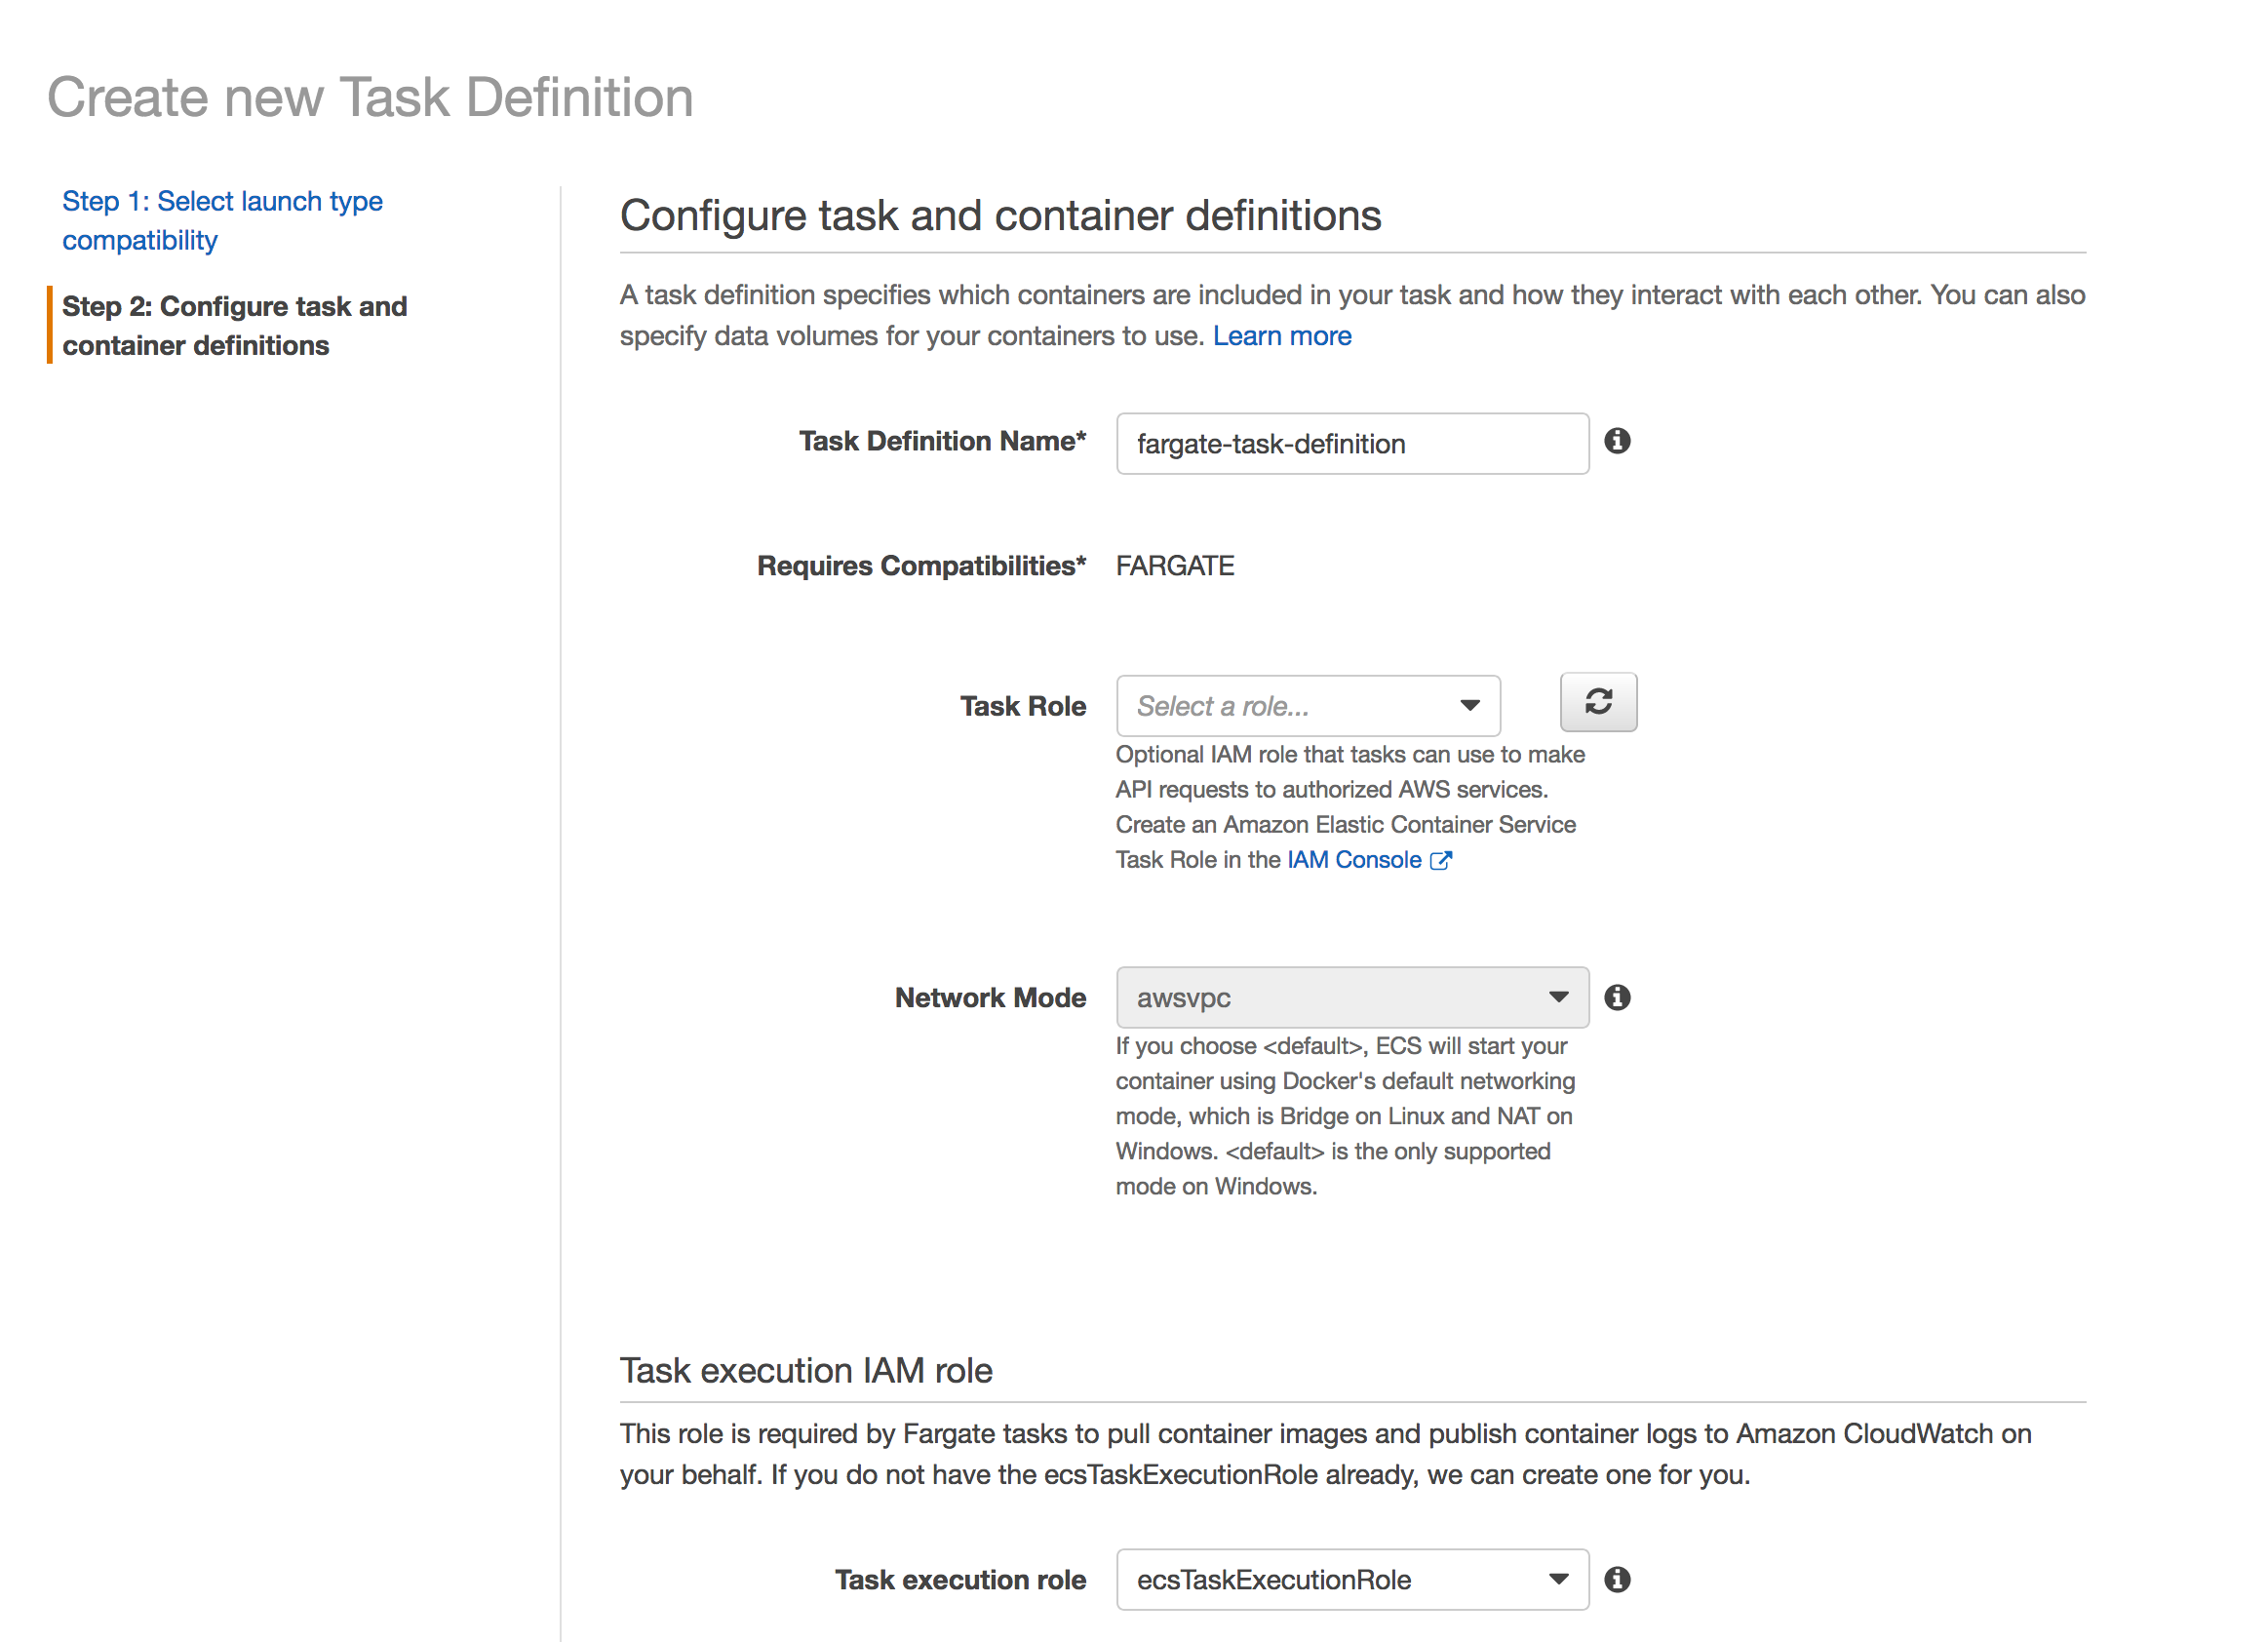
Since we are not using any AWS services in the task, we do not need a Task Role. The Task Execution IAM Role is automatically assigned to this task, called ecsTaskExecutionRole which lets the task pull the image from ECR and write to CloudWatch logs.
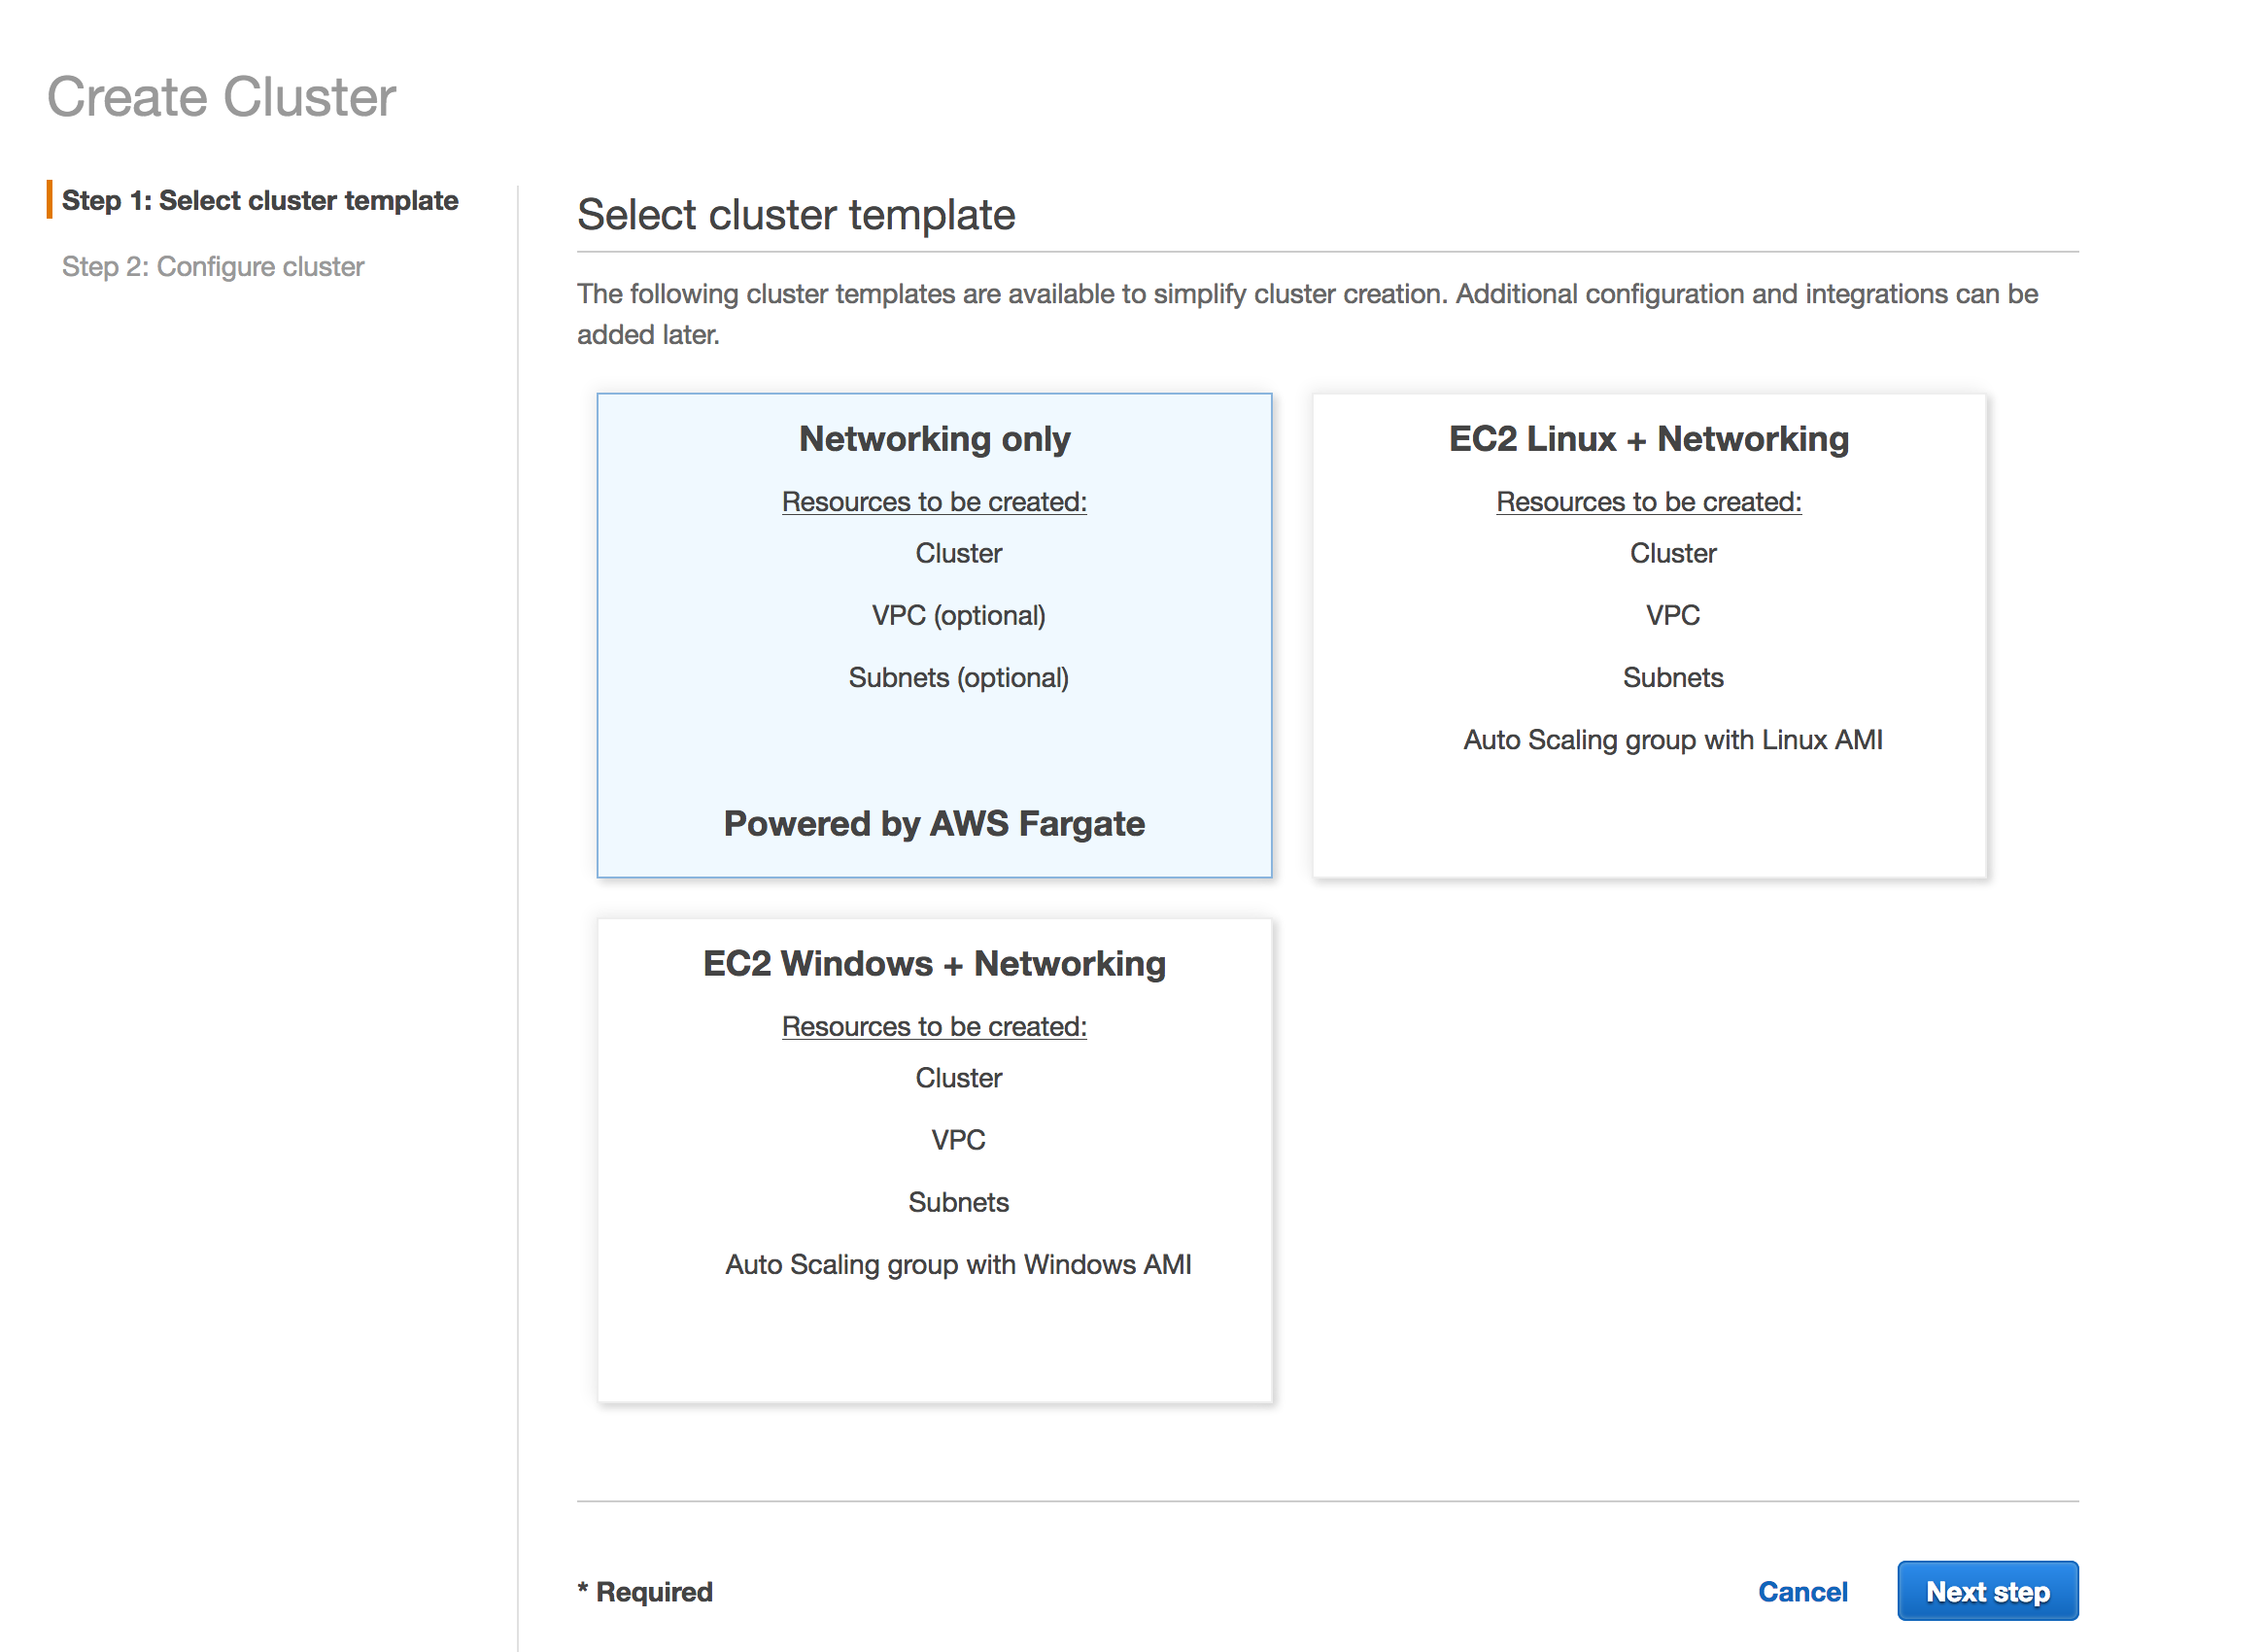
Fargate Cluster
Even though we are not really provisioning any EC2 Clusters like ECS or Batch, we still need to create a cluster. This will not have any EC2 instances. The Cluster is still an important construct that adds a level of control for IAM policies, etc.
Head over to ECS, and create a Fargate Cluster. Do not ask to create a new VPC. Call it fargatecluster.
Package the Deployment
We will now create a lambda function that can be called via a trigger. In case of batch, we can use CloudWatch to trigger the Lambda at the interval or cron schedule of our choice.
Here is the Lambda Code to run the task, as run_task.py. Create a folder to stick this file in.
import boto3
def handler(event,context):
  client = boto3.client('ecs')
  response = client.run_task(
  cluster='fargatecluster', # name of the cluster
  launchType = 'FARGATE',
  taskDefinition='my-batch-job:1', # replace with your task definition name and revision
  count = 1,
  platformVersion='LATEST',
  networkConfiguration={
        'awsvpcConfiguration': {
            'subnets': [
                'subnet-2ec3a94a', # replace with your public subnet or a private with NAT
                'subnet-413a9c6e' # Second is optional, but good idea to have two
            ],
            'assignPublicIp': 'DISABLED'
        }
    })
  return str(response)
Next, we will use pip to install boto3 1.4.8 in this folder, so we can package our deployment artifact.
$ pip3 install boto3==1.4.8 -t .
$ zip -r /tmp/run_task_lambda.zip *
This will create /tmp/run_task_lambda.zip which is our deployment package.
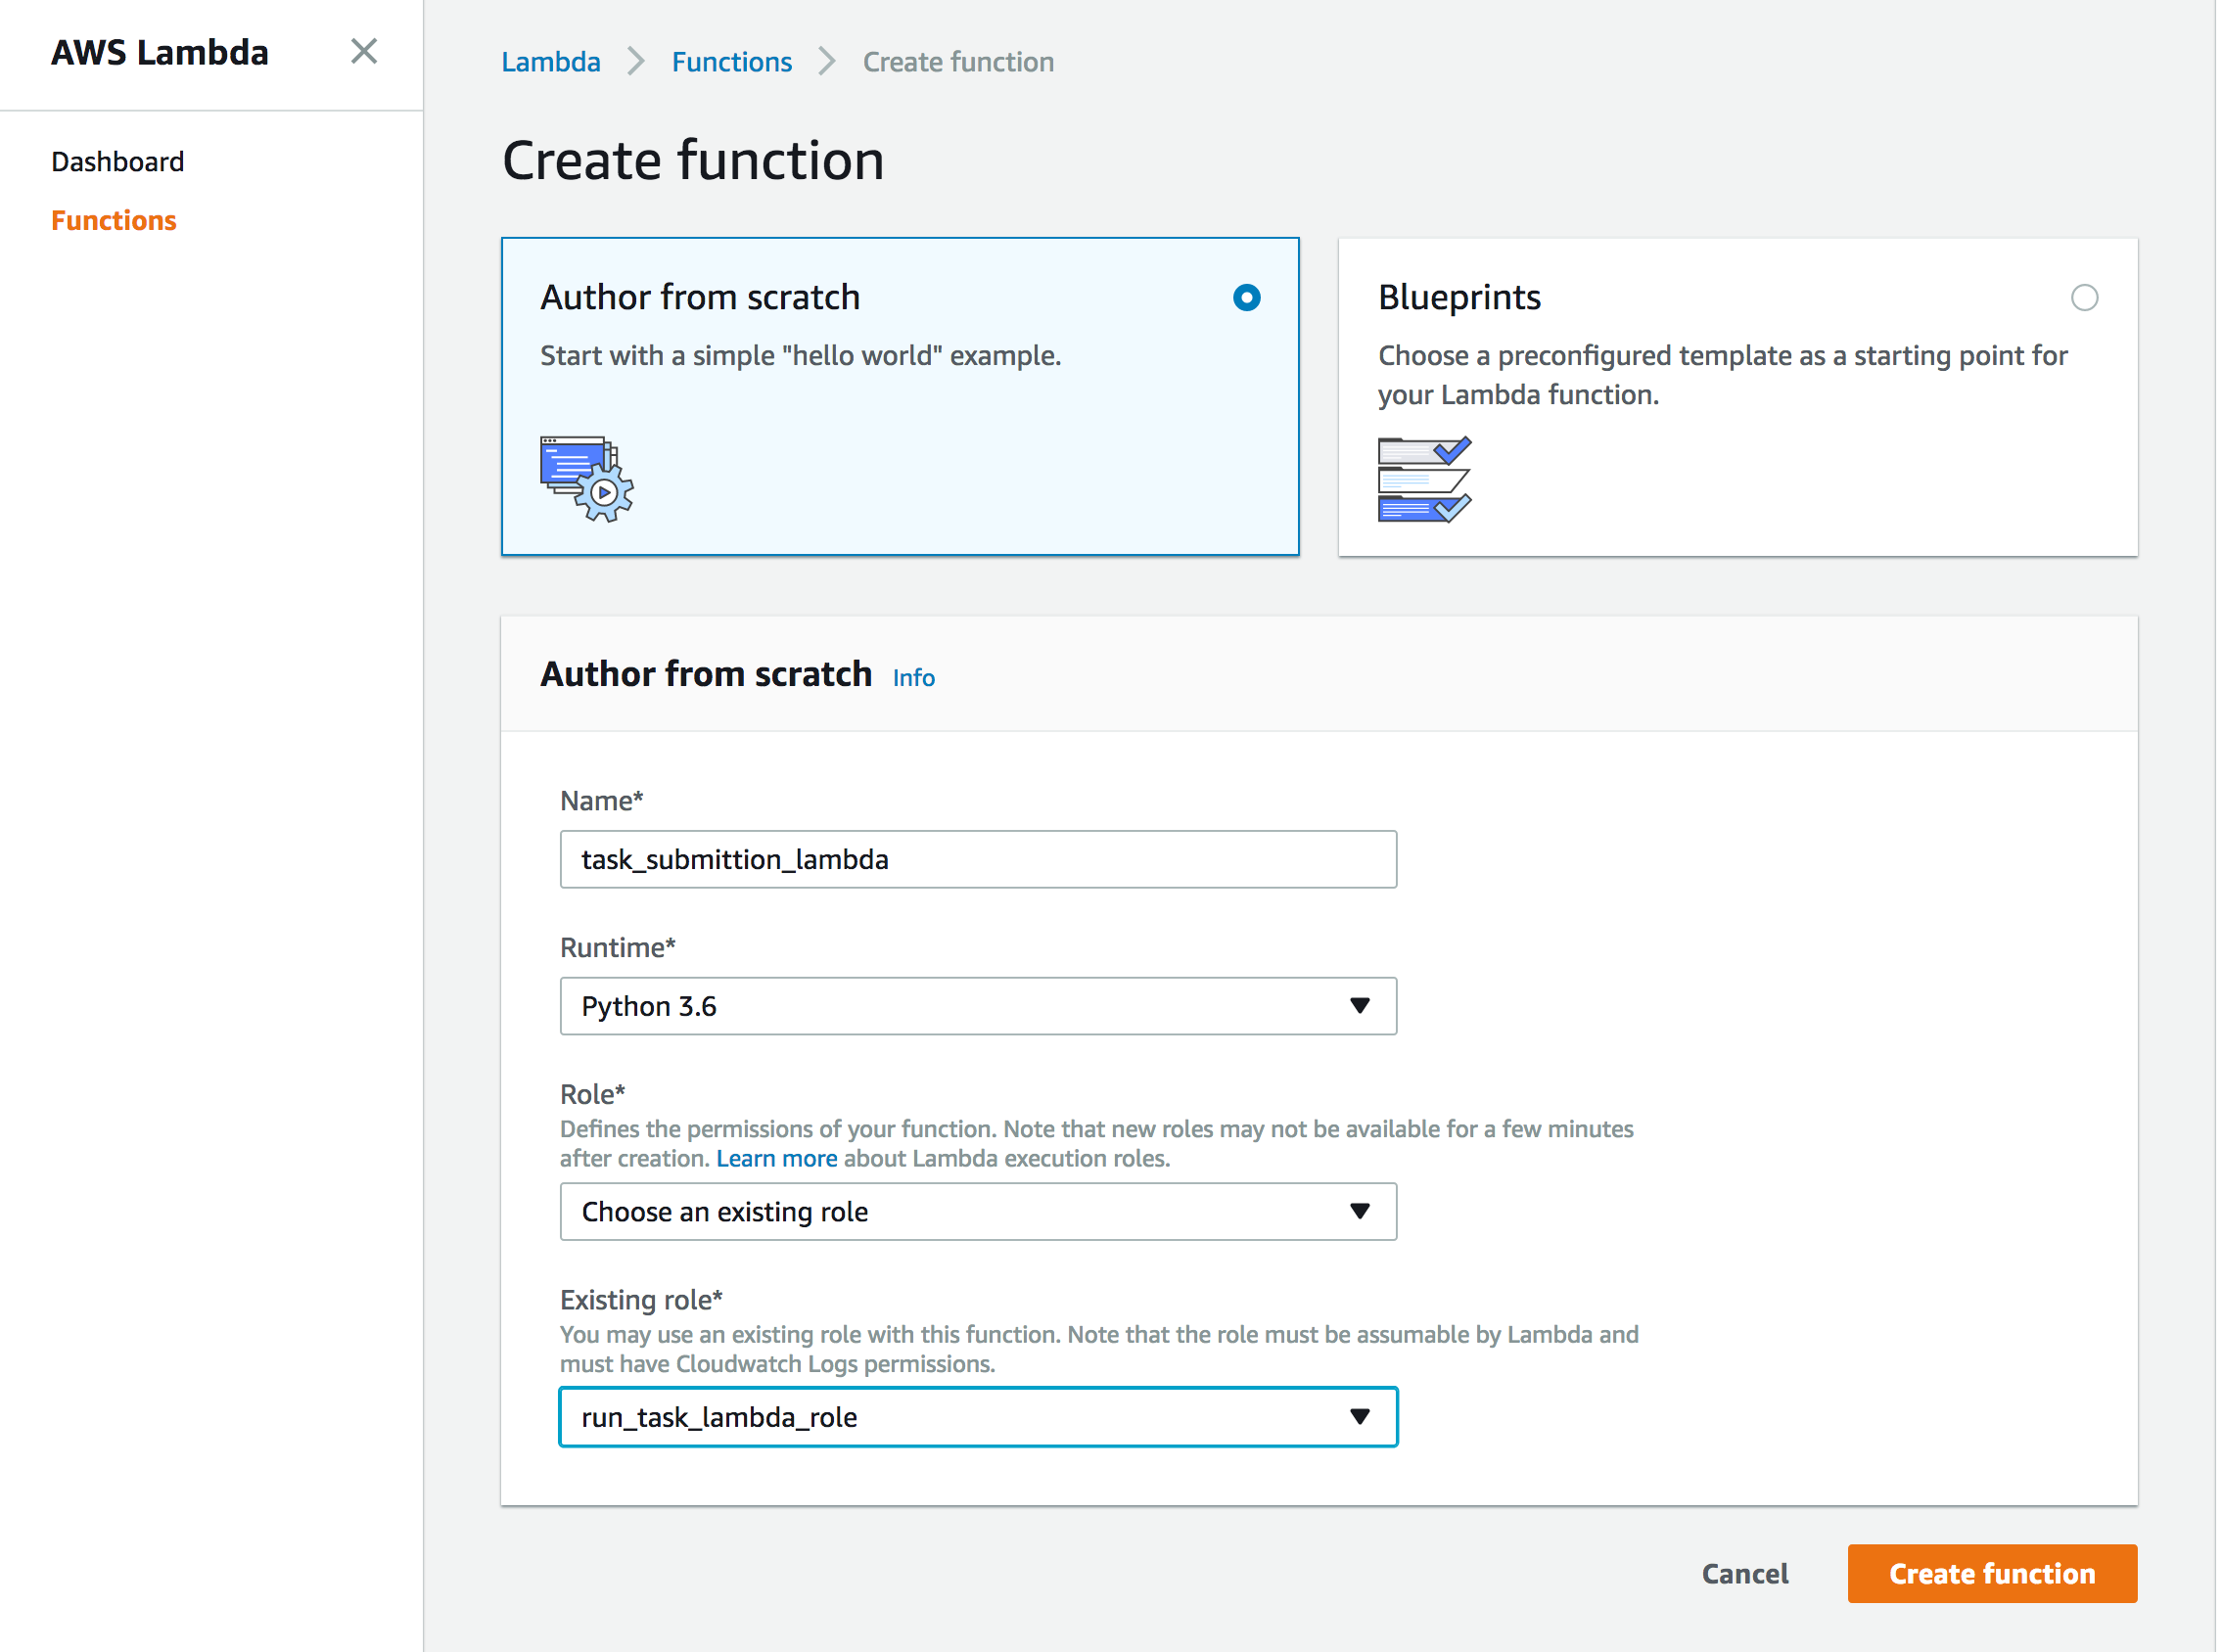
Create the Lambda Function
The Lambda would need IAM role with 2 policies - one to run the task, and second to pass the ecsTaskExecutionRole to the task.
Create a role in IAM, called run_task_lambda_role with the following in-line policy, replacing the ***** with your AWS Account ID.
{
    "Version": "2012-10-17",
    "Statement": [
        {
            "Sid": "Stmt1512361420000",
            "Effect": "Allow",
            "Action": [
                "ecs:RunTask"
            ],
            "Resource": [
                "*"
            ]
        },
        {
            "Sid": "Stmt1512361593000",
            "Effect": "Allow",
            "Action": [
                "iam:PassRole"
            ],
            "Resource": [
                "arn:aws:iam::************:role/ecsTaskExecutionRole"
            ]
        }
    ]
}
Now, we create the Lambda using the Lambda Console.
On the next page, under Function code, upload the run_task_lambda.zip, and put run_task.handler under Handler. Click Save so the package can be uploaded.
Once the function is saved, click Test to give it a shot. If all goes well, it should print something like this -
"{'tasks': [{'taskArn': 'arn:aws:ecs:us-east-1:************:task/3f9ae8bf-207e-4956-b625-52a5a269c9a2', 'clusterArn':
'arn:aws:ecs:us-east-1:************:cluster/fargatecluster', 'taskDefinitionArn':
'arn:aws:ecs:us-east-1:************:task-definition/my-batch-job:1', 'overrides': {'containerOverrides': [{'name':
'python-batch-container'}]}, 'lastStatus': 'PROVISIONING', 'desiredStatus': 'RUNNING', 'cpu': '256', 'memory': '512',
'containers': [{'containerArn': 'arn:aws:ecs:us-east-1:************:container/fcd6372b-8884-4beb-b7f8-484e5658fec8',
'taskArn': 'arn:aws:ecs:us-east-1:************:task/3f9ae8bf-207e-4956-b625-52a5a269c9a2', 'name': 'python-batch-container',
'lastStatus': 'PENDING', 'networkInterfaces': []}], 'version': 1, 'createdAt': datetime.datetime(2017, 12, 4, 8, 4, 5, 717000,
  tzinfo=tzlocal()), 'group': 'family:my-batch-job', 'launchType': 'FARGATE', 'platformVersion': '1.0.0', 'attachments':
  [{'id': '1cfdc261-f810-4625-a070-d7596aa22eea', 'type': 'ElasticNetworkInterface', 'status': 'PRECREATED', 'details':
  [{'name': 'subnetId', 'value': 'subnet-2ec3a94a'}]}]}], 'failures': [], 'ResponseMetadata': {'RequestId':
  'b21a8d3d-d8c9-11e7-9000-014e69a44058', 'HTTPStatusCode': 200, 'HTTPHeaders': {'server': 'Server', 'date': 'Mon, 04 Dec 2017
  08:04:05 GMT', 'content-type': 'application/x-amz-json-1.1', 'content-length': '1007', 'connection': 'keep-alive',
  'x-amzn-requestid': 'b21a8d3d-d8c9-11e7-9000-014e69a44058'}, 'RetryAttempts': 0}}"
Notice the response containing details of the task, and the task state as PROVISIONING.
START RequestId: b1667f61-d8c9-11e7-9ddf-f1af7a353833 Version: $LATEST
END RequestId: b1667f61-d8c9-11e7-9ddf-f1af7a353833
REPORT RequestId: b1667f61-d8c9-11e7-9ddf-f1af7a353833	Duration: 1891.77 ms
Billed Duration: 1900 ms 	Memory Size: 128 MB	Max Memory Used: 38 MB
You can head over to ECS Console, and check the task running under the fargatecluster details.
If the task fails to run, it is very likely because it was launched in a subnet with no outbound internet access. Fix the subnets, redeploy the lambda after changing the subnet IDs in the code, and retry.
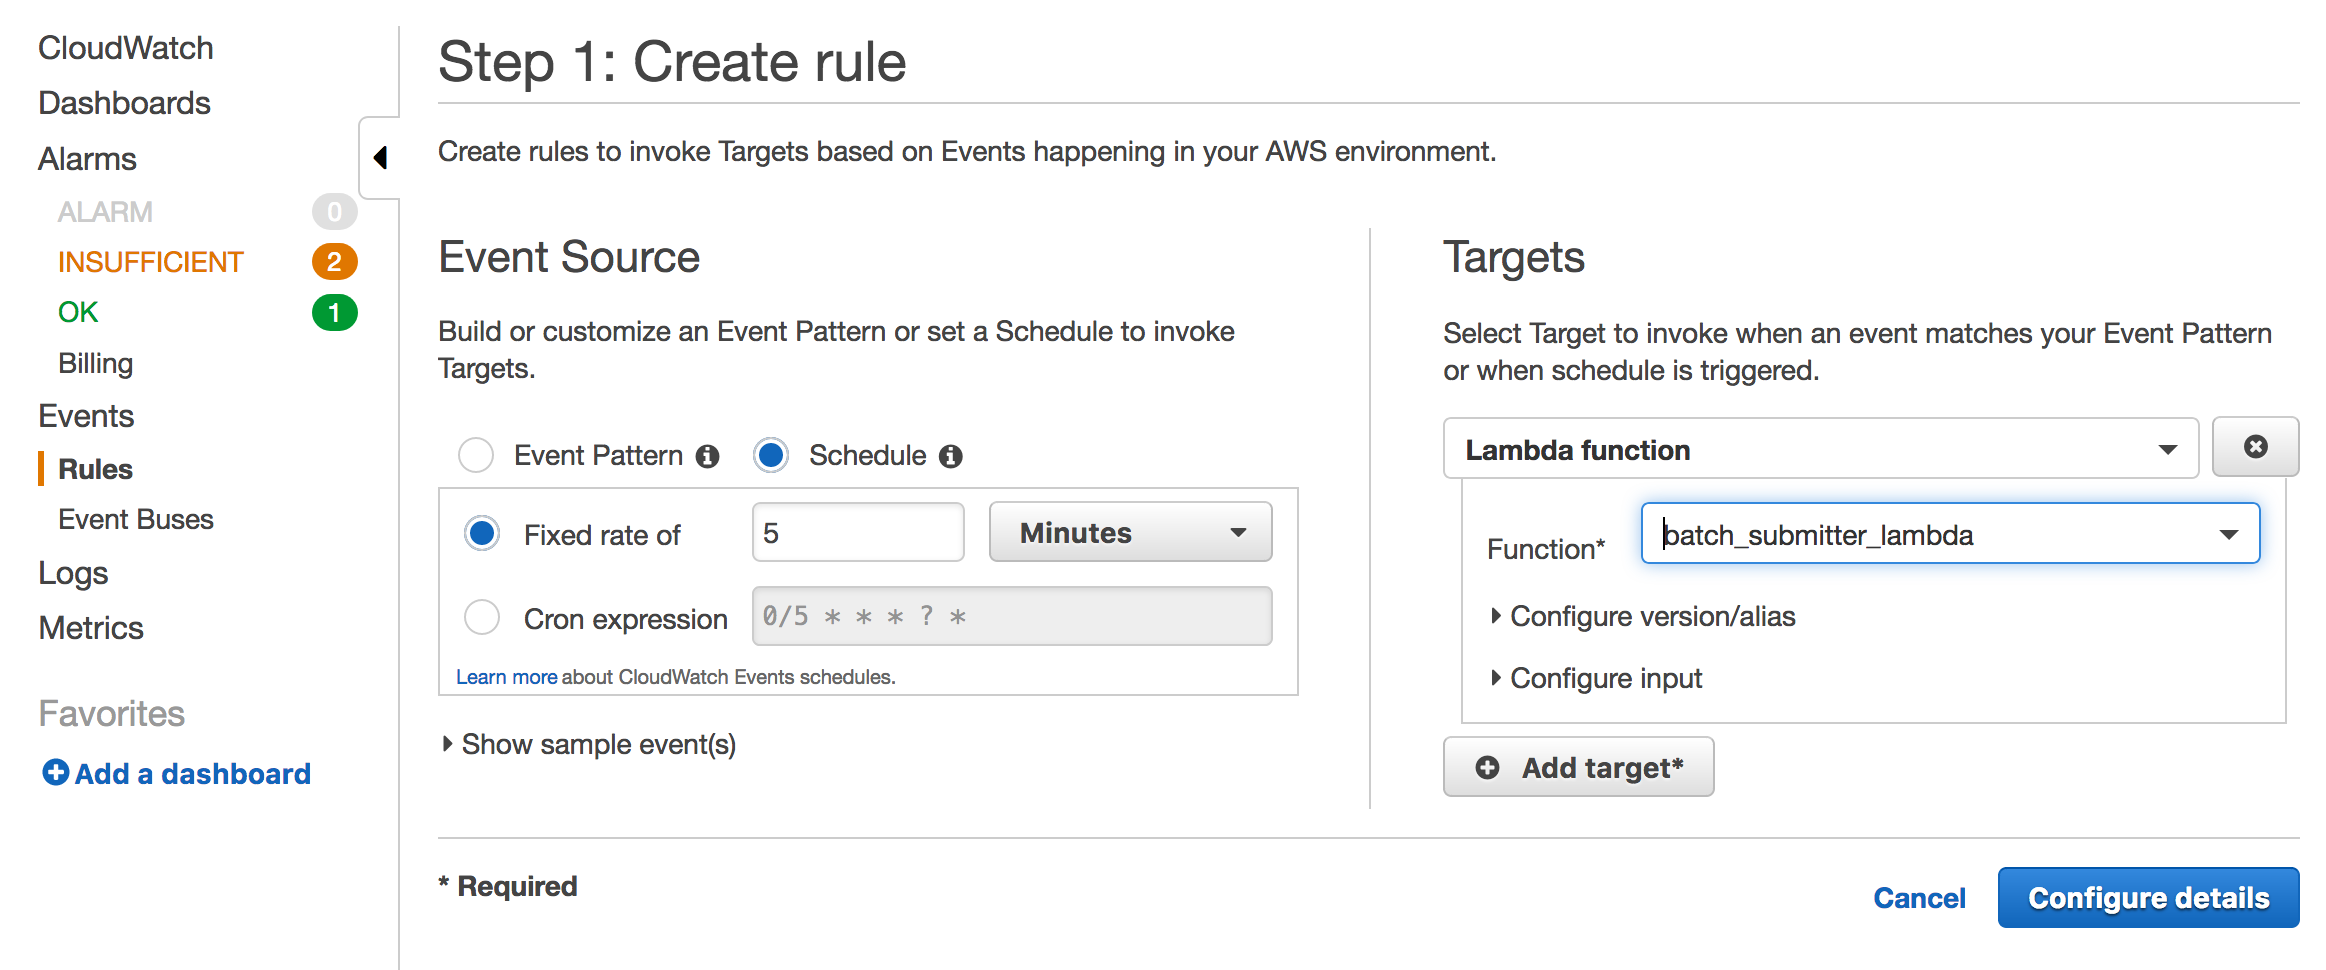
CloudWatch Event Trigger
Now we can put this execution on a schedule using CloudWatch Events. We will create a scheduling rule, and configure it to trigger this lambda function.
Click Create Rule on the CloudWatch Events menu to create a rule.
Done!
We can check the task being executing every 5 minutes (or whatever you’ve configured the rule to be) by looking at the ECS cluster console, or CloudWatch logs. You can also visit the Lambda monitoring section from the Lambda console to see the duration and frequency.
Cleanup
To clean up, disable or delete the scheduling rule in CloudWatch, and delete the function from the Lambda Console. Be sure to delete the rule to avoid getting billed for executions on a fairly frequent rate.
Since Fargate is a fairly new service, I’d love to hear your feedback and comments.