AWS Lambda with Serverless Framework and Java/Maven - Part 3
In this final post of the series on Java-based Serverless Lambda API, we will invoke the Transactions API using the Amazon API Gateway.

As Lambda is evented, the HTTP endpoints exposed via the Amazon API Gateway will act as the event to trigger the function synchronously. If you have been following the earlier two posts, by the end of this post you will be comfortable building RESTful APIs using AWS Lambda, Java, DynamoDB (or any persistence layer), API Gateway - all put together using simple configuration in Serverless Framework.
Set up Serverless Framework
Please refer to AWS Lambda with Serverless Framework and Java/Maven - Part 1.
Build and deploy the Transactions API Lambdas
Please refer to AWS Lambda with Serverless Framework and Java/Maven - Part 2.
Using Amazon API Gateway
Now that we have our two functions deployed, we can use API Gateway to trigger, or invoke them. The Amazon API Gateway is a service that lets us expose many supported AWS offerings via RESTful API over HTTP. While in this case we will only use the API Gateway to expose and invoke our Lambda as an HTTP endpoint, this only covers a fraction of the API Gateway’s capability. I highly recommend reading the Amazon API Gateway Developer Guide and this video from AWS Summit to get familiar with full potential of the API Gateway product.
Lambda Proxy Integration
We will be integrating the Lambdas in an integration pattern commonly referred to as Lambda Proxy Integration, which means that the function(s) will get entire HTTP request as-is in the form of the input payload. This payload contains the entire request including the headers, query parameters, path parameters, and the body, as documented here. While the function has full control on rendering the response body, code, and headers, the response is expected to be in a particular format, as documented here. Serverless Framework creates an ApiGatewayResponse class as a part of the scaffolding which does exactly that. If you notice, the Transactions API code uses that class to marshal the response.
By default, Serverless Framework uses the Lambda Proxy Integration for API Gateway.
Configuring Serverless To Define Endpoints
The API endpoints will need to be defined in serverless.yml, where we have defined the function resources, IAM permissions, and handlers among other things. The API Gateway configuration is a part of the function definition. Add the following under the handler section for the two functions.
For the GET /accounts/:account_id/transactions endpoint -
get-transactions:
    handler: com.serverless.GetTransactionsHandler
    events:
      - http:
          path: /accounts/{account_id}/transactions
          method: get
For the POST /accounts/account_id/transactions endpoint -
post-transaction:
  handler: com.serverless.PostTransactionsHandler
  events:
    - http:
        path: /accounts/{account_id}/transactions
        method: post
Lambda functions need an event to be triggered. The API Gateway invocation is one of the many events supported by AWS Lambda. Hence, we define http as the event under the function definition. Note that we can add more such events in the configuration, but for now we focus on HTTP invocation via the API Gateway. The endpoints will be https, so do not worry about calling the event as http here. Next, we provide more information about the http integration, namely the path and method. Notice the path parameter, {account_id} in the path.
For more details on the serverless.yml configuration for API Gateway, refer to Serverless Framework API Gateway documentation here.
Deploying the API
Now that we have configured the event and the endpoint, we are all set to deploy the Serverless project. Before we do that, we need to attach the IAM policy to the serverless user in order to administer the API Gateway. Remember, we are using this user’s credentials for the Serverless Framework. This is different than the Lambda Execution Role that was configured in the last post.
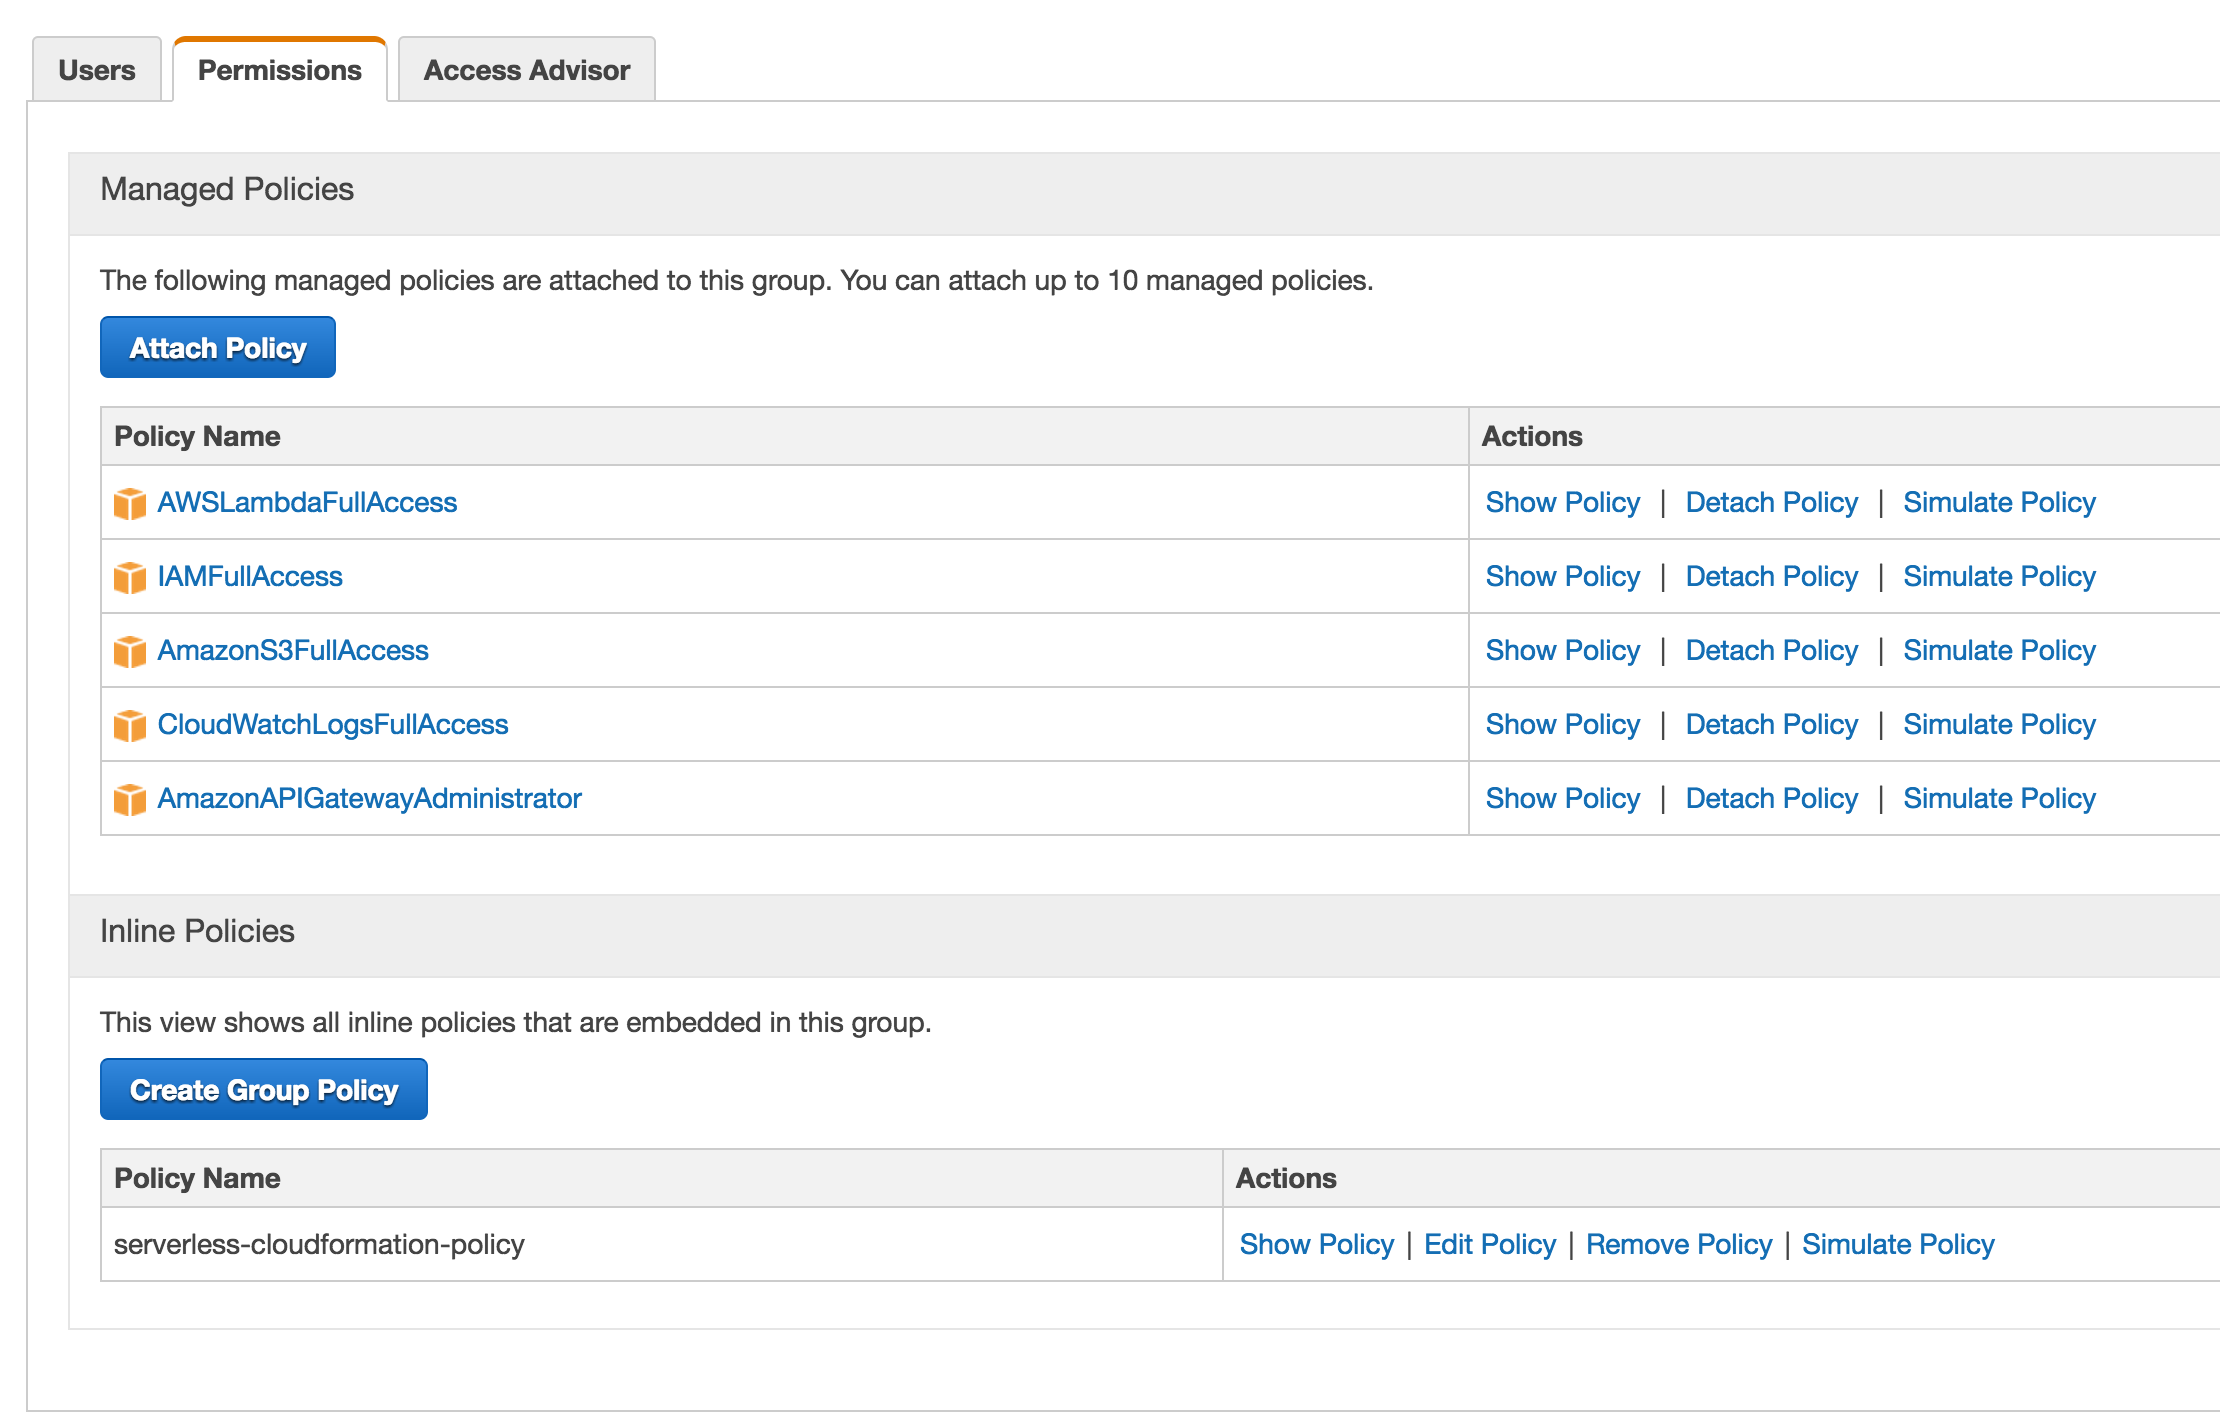
Log in to the AWS console, and click the Serverless group we had created in Part-1. Click on Attach Policy, Search for APIGateway, and add the AmazonAPIGatewayAdministrator policy to the group.
The final set of policies should look like this -
Once done, we run the now familiar serverless deploy command.
bash-3.2$ serverless deploy
Serverless: Uploading CloudFormation file to S3...
Serverless: Uploading service .zip file to S3 (7.57 MB)...
Serverless: Updating Stack...
Serverless: Checking Stack update progress...
..........................................
Serverless: Stack update finished...
Service Information
service: transactions-api
stage: dev
region: us-east-1
api keys:
  None
endpoints:
  GET - https://aaaaaa.execute-api.us-east-1.amazonaws.com/dev/accounts/{account_id}/transactions
  POST - https://aaaaaa.execute-api.us-east-1.amazonaws.com/dev/accounts/{account_id}/transactions
functions:
  get-transactions: transactions-api-dev-get-transactions
  post-transaction: transactions-api-dev-post-transaction
If we compare the output of this command to the one we got during deploying just the functions, we see that we get additional information in terms of the endpoints. I’ve masked the endpoint with aaaaaa. This is referred to as an appID.
Testing the Endpoints
We can use curl or any handy HTTP client to hit the two endpoints.
First we POST a transaction.
bash-3.2$ curl -X POST https://aaaaaa.execute-api.us-east-1.amazonaws.com/dev/accounts/1234/transactions -d '{"transaction_id":"foo", "amount": 20.50}'

{"message":"Transaction added successfully!","input":{"resource":"/accounts/{account_id}/transactions","path":"/accounts/1234/transactions","httpMethod":"POST","headers":{"Accept":"*/*","CloudFront-Forwarded-Proto":"https","CloudFront-Is-Desktop-Viewer":"true","CloudFront-Is-Mobile-Viewer":"false","CloudFront-Is-SmartTV-Viewer":"false","CloudFront-Is-Tablet-Viewer":"false","CloudFront-Viewer-Country":"US","Content-Type":"application/x-www-form-urlencoded","Host":"aaaaaa.execute-api.us-east-1.amazonaws.com","User-Agent":"curl/7.51.0","Via":"1.1 939ea9d62ec616846d41b16cea0dc65b.cloudfront.net (CloudFront)","X-Amz-Cf-Id":"YFSlfpQhMoyUk7xw1MwaHrC55oS-kL68gc9Of-hIa68bSr_61eK2Jw==","X-Amzn-Trace-Id":"Root=1-58f327f0-5c9c884966463c313adaf2b5","X-Forwarded-For":"73.111.62.170, 54.239.203.116","X-Forwarded-Port":"443","X-Forwarded-Proto":"https"},"queryStringParameters":null,"pathParameters":{"account_id":"1234"},"stageVariables":null,"requestContext":{"accountId":"123456789012","resourceId":"6otyx5","stage":"dev","requestId":"bd4b3165-227c-11e7-baa4-61d7c2f92db9","identity":{"cognitoIdentityPoolId":null,"accountId":null,"cognitoIdentityId":null,"caller":null,"apiKey":null,"sourceIp":"73.111.62.170","accessKey":null,"cognitoAuthenticationType":null,"cognitoAuthenticationProvider":null,"userArn":null,"userAgent":"curl/7.51.0","user":null},"resourcePath":"/accounts/{account_id}/transactions","httpMethod":"POST","apiId":"aaaaaa"},"body":"{\"transaction_id\":\"foo\", \"amount\": 20.50}","isBase64Encoded":false}}
Notice the long response - this is because in the code for PutTransactionsHandler.java, we’re adding the input as a part of the response (for troubleshooting). This input should also confirm our understanding of Lambda Proxy Integration. Formatted correctly, this is what the function got as a input from the AWS API Gateway -
{
   "resource":"/accounts/{account_id}/transactions",
   "path":"/accounts/1234/transactions",
   "httpMethod":"POST",
   "headers":{
      "Accept":"*/*",
      "CloudFront-Forwarded-Proto":"https",
      "CloudFront-Is-Desktop-Viewer":"true",
      "CloudFront-Is-Mobile-Viewer":"false",
      "CloudFront-Is-SmartTV-Viewer":"false",
      "CloudFront-Is-Tablet-Viewer":"false",
      "CloudFront-Viewer-Country":"US",
      "Content-Type":"application/x-www-form-urlencoded",
      "Host":"aaaaaa.execute-api.us-east-1.amazonaws.com",
      "User-Agent":"curl/7.51.0",
      "Via":"1.1 939ea9d62ec616846d41b16cea0dc65b.cloudfront.net (CloudFront)",
      "X-Amz-Cf-Id":"YFSlfpQhMoyUk7xw1MwaHrC55oS-kL68gc9Of-hIa68bSr_61eK2Jw==",
      "X-Amzn-Trace-Id":"Root=1-58f327f0-5c9c884966463c313adaf2b5",
      "X-Forwarded-For":"73.111.62.170, 54.239.203.116",
      "X-Forwarded-Port":"443",
      "X-Forwarded-Proto":"https"
   },
   "queryStringParameters":null,
   "pathParameters":{
      "account_id":"1234"
   },
   "stageVariables":null,
   "requestContext":{
      "accountId":"123456789012",
      "resourceId":"6otyx5",
      "stage":"dev",
      "requestId":"bd4b3165-227c-11e7-baa4-61d7c2f92db9",
      "identity":{
         "cognitoIdentityPoolId":null,
         "accountId":null,
         "cognitoIdentityId":null,
         "caller":null,
         "apiKey":null,
         "sourceIp":"73.111.62.170",
         "accessKey":null,
         "cognitoAuthenticationType":null,
         "cognitoAuthenticationProvider":null,
         "userArn":null,
         "userAgent":"curl/7.51.0",
         "user":null
      },
      "resourcePath":"/accounts/{account_id}/transactions",
      "httpMethod":"POST",
      "apiId":"aaaaaa"
   },
   "body":"{\"transaction_id\":\"foo\", \"amount\": 20.50}",
   "isBase64Encoded":false
}
Lets GET the transaction that has just posted, via curl again.
bash-3.2$ curl  https://aaaaaa.execute-api.us-east-1.amazonaws.com/dev/accounts/1234/transactions
[{"account_id":"1234","transaction_date":1492330481722,"transaction_id":"foo","amount":20.5}]
Since we are not passing the input as a part of the output in GetTransactionsHandler, we do not see the extra information. However, we do return the input in case of an exception, again, for troubleshooting purposes.
You will also notice a delay (as much as 5-10 seconds) for the first invocation. This is called the cold start time, and as developers we’ve to be aware of this. Specially with compiled languages like Java and C#, the start/boot time for a Lambda may exceed the SLA you may have - something to be mindful about.
The more infrequently the Lambda is invoked, greater the cold start cost. There are plenty of workarounds to address the cold start problem, I will cover some in a separate post as well.
Cleanup
If you wish to remove the AWS infrastructure created as a part of this project, use the following command to do so. This will remove the IAM roles, any resources defined in serverless.yml, and destroy the CloudFormation stack.
bash-3.2$ serverless remove
Serverless: Getting all objects in S3 bucket...
Serverless: Removing objects in S3 bucket...
Serverless: Removing Stack...
Serverless: Checking Stack removal progress...
..................................
Serverless: Stack removal finished...
Summary
In this series, we have built what is essentially a scaled-down version of a Microservices based architecture. We built 2 Lambda functions, both of which can scale independent of each other. We learnt about the IAM permissions, and most importantly, about the Serverless Framework which let us focus on the functionality instead of worrying about deployment and management of the infrastructure like IAM, DynamoDB, API Gateway, S3, and the Lambda itself.
This is nowhere close to what you’d imagine for a Production system, but it is my hope and confidence that the series has you more informed and familiar with Serverless Applictions in AWS.
Please DM/tweet me your feedback, and thanks again for stopping by!